Inside This Article| 1. | How to set up your website connection details in FileZilla |
| | |
How to set up your website connection details in FileZilla
To use Free FTP program
FileZilla Client to upload and download files between your local computer and your website, you need to configure your site in FileZilla. By default you don't have to configure all the configuration fields FileZilla, so you can start directly working with the program, but setting up your website's FTP connection properly is a must.
Step 1: Open FileZilla.
FileZilla can be started from Windows Start menu, Desktop, or Quick Launch bar.
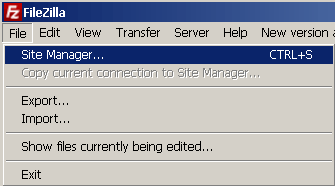
Step 2: In the File menu dropdown, click Site Manager.
The Site Manager can manage unlimited web hosting server accounts so that you can quickly connect to them. It stores their addresses and
their logon information and you don't have to remember all server details. FileZilla will do that for you.
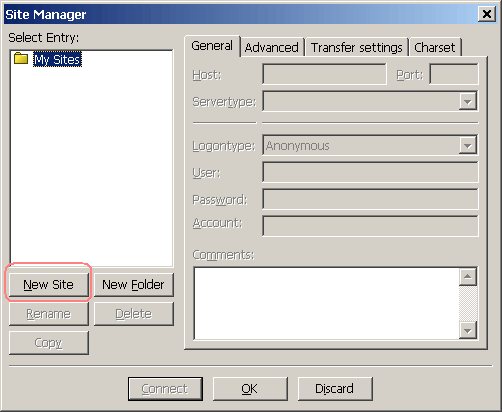
Step 3: When the Site Manager window is opened, click the button New Site and name it as anything you like as long as
it is easily identifiable for your site.
Step 4: Enter your site information on the General tab of the Site Manager window.
Here is a screenshot for GeeksEngine in FileZilla.
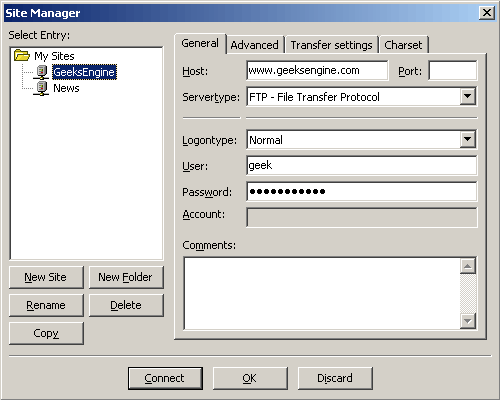
Here are the fields and the type of information you need to enter.
| Host: |
Enter your website domain name here |
| Port: |
In normal cases, you can leave this field blank. You only need to enter the port number if it is not the default port (21 for FTP, 22 for SFTP). |
| Servertype: |
You can use the default value (FTP - File Transfer Protocol), or if you use secure transfer, choose one of other values.
- FTP - The default protocol of FileZilla
- FTP over SSL (explicit encryption) - used to connect through SSL secured servers, secure channel gets established upon connection.
- FTP over SSL (implicit encryption) - used to connect through SSL capable servers, secure channel gets established before logon.
- SFTP using SSH2 - uses to connect to an SFTP server using an encrypted connection
|
| Logontype: |
You should choose Normal or Ask for password in the dropdown. See description about each option below.

Logon type specifies the way in which FileZilla will connect to the web hosting server. If you select anonymous,
you can't enter a username and password. In this case the username always is anonymous.
When you select Normal, every time you connect to your hosting server, you use the username and password
you entered in Site Manager. FileZilla remembers the username and password and you don't have to enter them again.
You can use this option if the computer you use can be trusted.
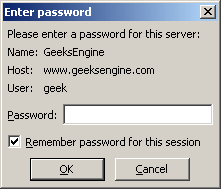
When you select Ask for password, you are prompted to enter the password when you connect to your web hosting server.
FileZilla can remember the password during the current session if you tick the box (see screenshot below). Use this option if you, for example, use FileZilla on a public computer.
When you select Interactive, you are prompted to enter the password every time you upload a file to your hosting server. Not a very useful option.
For the option Account, you need to enter an account name. I have never used this option.
|
| User: |
Enter your username which is sent to you by your web hosting company. It should be the same as the one you use to log into CPanel. |
| Password: |
Enter your password here. |
Step 5: Enter info on Advanced tab.
Click Advanced tab and enter info in Default local directory field and Default remote directory field.
| Default local directory: |
Select a directory on your local computer that contains the source files of your web site.
When you connect to your hosting server, FileZilla's Local site panel (normally on the left hand side of FileZilla)
opens this default local directory in the style of Windows Explorer.
|
| Default remote directory: |
You can leave this field blank if you don't know what to enter. Or you can enter something like /public_html for the moment. You can always change it later.
/public_html is normally the directory name of the web root on your hosting server.
Remote directory means the directory on your hosting web server which is normally displayed in the right hand side panel of FileZilla.
Once FileZilla connects to your web host, it can switch to the default remote directory you have entered here. If you leave it blank, your account root directory (one level above the web root)
is always opened.
|
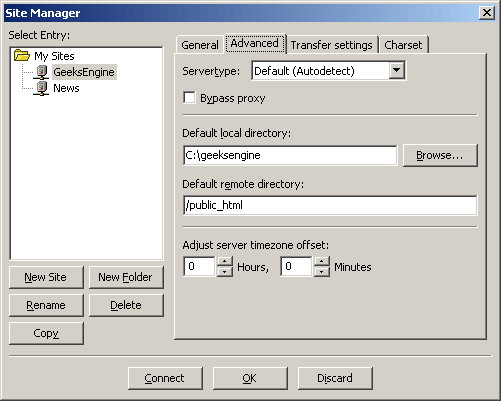
All other fields can be left no change on Advanced tab.
You also don't need to enter anything on the other two tabs - Transfer Settings and Charset.
Step 6: After all done, click the button Connect.
If everything has been set up correctly, FileZilla will connect to your hosting server. You should see some directories
displayed in the right hand side panel of FileZilla. These are the directories on your hosting company's web server.
You can manage files and directories on the right hand side panel. Things you can do include
View / Edit files, Create Directory, Delete, Rename files, and set file permissions. See next section for details.
Copyright© GeeksEngine.com
|
Inside This Article
| 1. | How to set up your website connection details in FileZilla |
| | |
Other Recent Articles from the Webmaster Help category:
|


